Pages

Showing posts with label recipe. Show all posts

Friday, October 8, 2010

Classic Sourdough Bread--Day Four, The pièce de résistance!

Are you ready? Today we're baking our bread. Yippee!

DAY FOUR

Allow 2 3/4 hours for warming (1 hr), baking (42 min) and cooling (1 hr) before you dig into your wonderful loaves.

1)  Bring your loaves to room temp 1 hour prior to baking. Preheat oven and steam pan to 475*. A steam pan is a 9 X 13" pan or a cast iron skillet that can take high heat in the oven. It is placed on the oven rack below the rack that you'll set your loaf sheet on. I have a 9 X 13" pan delegated to this purpose, as the mineral deposits on the pan left from the water boiling out make it rather unappetizing to think about baking in.

2) Uncover and score the loaves. I use a serrated knife, slashing 3 rows about 1/2 an inch deep. Don't worry if the dough deflates a bit; it will bounce back while it bakes.


3) Spritz oven and loaves with mist, pour 1 c. water in steam pan. In 2 min., repeat spritzing and lower temp to 450*. Bake 30 min, turning pan halfway through. If you find your bread browns too much, try this tip from our friend Barb and cover the loaves with tin foil the last 10 minutes of baking. Turn off oven, let rest inside 10 min. Cool on racks 1 hour (waiting is the hardest part of the whole four days!).

Now you are ready to slice your bread into nice thick slices and serve plain or with butter. We enjoyed ours tonight with a fresh chef salad, but a steaming bowl of thick soup would be great on a cold evening. Yummmmm....


Thursday, October 7, 2010

Classic Sourdough Bread--Day Three, Making the dough

Today starts the really fun part, making and proofing the dough! Roll up your sleeves (literally; you won't be able to get them out of your way once you get started) and jump in!


DAY THREE


You'll work with your dough a couple of times through the day today. Plan to start at least 8-9 hours before you need to go to bed.


For the dough, you'll need:

            Firm starter at room temperature, torn in 3-4 pieces
            3 c. bread flour
            1 ½ tsp. salt
            1 tsp sugar
            1 c. cool water (70*)

Mix together and knead 5-6 min. in mixer with a dough hook or 8-10 min. by hand till gluten has developed and reaches 77-80* on a probe thermometer. You can also do what I prefer most, which is to mix the ingredients with the dough hook until they are uniform and then turn it out on a floured countertop to knead by hand. There is just something mesmerizingly satisfying about kneading. It also gives you continuous feedback about the gluten development and moisture balance, which you can correct with minute additions of flour or sprinkles of water. If you can't read the dough the first few times you knead, don't worry; it will come with time and practice.

Dough is perfectly kneaded when it is soft and no longer sticks to the countertop. It springs back when you twist a small pinch. If you stretch a bit of dough between the thumb and fingers of each hand, it should stretch into a thin skin, ideally thin enough to let light through.


Place dough in clean bowl, cover, let sit at room temperature 4 hours. May not rise much (or it may!); regardless, allow it to sit 4 hours to develop flavor.

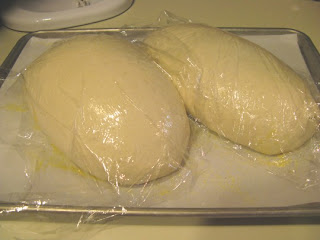
Divide in half with a sharp knife and shape into loaves. When shaping, be gentle and allow the gases in the dough to remain. Do not knead; rather, gently pat into a rectangle (mine were about 6 x 9"), fold in thirds, and pinch the seams closed. Place onto parchment dusted with corn meal, mist tops with Pam cooking spray and cover with plastic wrap.


Allow to sit at room temperature 4+ hours or till 1½ times volume. Refrigerate overnight.


These loaves sat out 3 hours and have doubled, so I put them in the refrigerator. I'm not photographing the inside of my fridge; some things just don't need to be shared on the Internet!

Tomorrow we'll be baking our loaves and get to eat the fruits of our labors. Yummmmm...

--Rose-Marie


Wednesday, October 6, 2010

Classic Sourdough Bread--Day Two, On to the firm starter...

Are you ready?

Yesterday we increased our regular sourdough starter. If you have been following the practice of adding less water than flour with each increase, your starter will be fairly thick. This is good. You have probably noticed that it is a very different texture than just flour mixed with water...those little yeasties have been busy at work!

DAY TWO

Today we are going to form the base of our dough, the firm starter. The principle is similar to a "sponge," but this is firmer than a traditional sponge. It will take 6-8 hours of time to develop and some resting time in the fridge overnight.

Mix together:

1 c sourdough starter at room temperature
1 c all-purpose flour
Room-temperature water as needed to form a soft ball (70-72*F)

Knead these together by hand or in a heavy-duty stand mixer until they form a soft ball, adding water as needed. The amount of water depends on several factors, including the water content in your starter and the humidity in the air and the flour. Your dough ball should be soft and smooth and even a bit sticky. Remember that the yeasties need a moist environment to work their magic, so err on the side of stickiness if you have any doubts. If your lump is dry now, you will end with a dry lump--literally--later.

Place the ball of firm starter in a clean bowl, cover with a layer of plastic wrap and let it sit out at room temperature until doubled. Doubling time varies with the vigor of your starter, the temperature of the room, the mood of the yeasties on that day, you name it. Refrigerate overnight, covered.

Ready to rise...


4 hours later...think I'll put this in the fridge

There are several things to note:

--a good probe thermometer is going to be more accurate than your wrist at determining "room temperature." I trust the thermometer much more than my own wrist.

--"sticky" dough will be tacky to the touch. You can lift it off the countertop but it doesn't want to sit there very long in one place or it will stick. Dough that it too sticky makes a mess of your hands and immediately latches like a limpet on the the surface of the counter. It can be corrected by kneading in a wee bit more flour. Dough that is too dry does not feel tacky and can sit on the counter without adhering. Naughty dough.


--kneading times can vary somewhat. For this step, you want the dough to be pliable and spring back into shape when pinched. But don't overknead. I am guilty of this and it's not a good thing. While dough has to be kneaded long enough to develop long strands of gluten protein, overkneading breaks the strands down into little pieces that can't hold the structure of the bread. If you are using a mixer with a dough hook, watch for the dough to climb the hook and clean off the sides of the bowl. It's easy to overknead with a mixer, so watch closely. It is also quite possible to overknead when kneading by hand (take flattery from the fact that you are so strong!), so be alert to that stage where the dough springs back.


--you'll notice that I use a steel bowl for mixing and raising. Yes, there are purists who say your sourdough should never touch metal, but I've never had a lick of trouble using metal bowls for this. To be perfectly honest, I haven't owned a glass mixing bowl to try instead, but this way has never failed me.

Tomorrow we get to make our loaves. Such fun! I hope you'll join me.

Tuesday, October 5, 2010

Classic sourdough bread, Day One--Let's get started!

Yummm...

Can't you just smell the warm tanginess of this sourdough bread? The crust is thick and crisp and crackles just right when you bite down; the center is moist and chewy. I'd love to offer you a piece. 


But since bread doesn't pass well through the Internet, we can walk through the process together so you can bake up your own pair of loaves. This takes a small bit of time over the course of four days (possibly just 3 1/2), so we'll tackle it one day at a time. I offer you my spin on Peter Reinhart's sourdough process from Crust and Crumb (Tenspeed Press, 2006). If you want the full run-down of his winning technique, treat yourself to a copy or put it on your Christmas wish list. Peter is masterful; I only hope I can do justice to what he has taught me in his book.

DAY ONE (or NIGHT ONE, as the case may be):

Increase your starter (see yesterday's post on increasing starter). Tomorrow you'll be using a cup of completed starter (unless you plan to make a double batch, so plan accordingly).

Today is a great day to make sure you have the ingredients and supplies on hand for the rest of the recipe. This makes 2 small loaves; double for 3 large loaves. But be warned--if you double the recipe, you will need to buy pants with a larger waistband. You will need:

unbleached all-purpose flour (1 c)
bread flour (3 c)
salt
sugar
corn meal

* * * * * * *
parchment paper
large baking sheet
9 x 13 baking pan OR cast iron skillet
probe thermometer (optional, but helpful when you are learning)
That's all there is. No commercial yeast required. If your recently fed starter is bubbling with enthusiasm, you can trust it to make your bread raise quite well.

--Rose-Marie